Create a Jira issue for your image scan results
deprecation and removal notice
This feature was deprecated in Calico Cloud version 21.1.0 and will be removed in a future release. Availability depends on when you started using Calico Cloud.
- For users who started using Calico Cloud in April 2025 or later, this feature is not available.
- Legacy users, who started using Calico Cloud before April 2025, can continue to use this feature until it is removed in a future release.
You can create and assign Jira issues with information about vulnerabilties from your Image Assurance scan results.
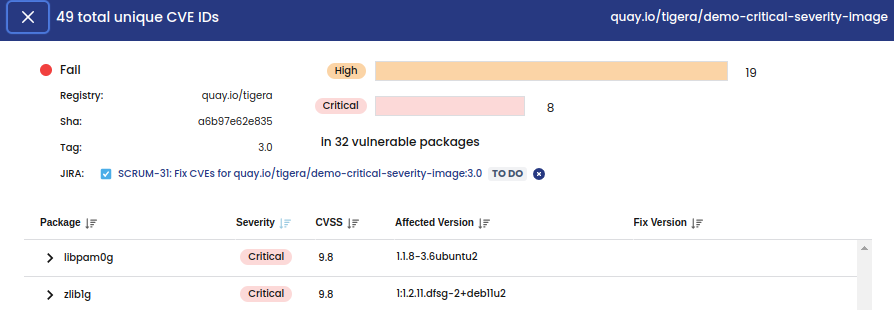
 Scan results detail with link to Jira issue.
Add Jira credentials to Calico Cloud
You must add Jira user credentials to Calico Cloud to create issues for scanned images.
Prerequisites
- You have access to a Jira user account with permissions to create issues in a project.
- For the Jira user account, you have:
- An Atlassian site URL. If you access Jira at the URL
https://<your-company>.atlassian.net/jira, then your site URL is<your-company>.atlassian.net. - An API token. For details on how to get an API token, see Manage API tokens for your Atlassian account.
- An Atlassian site URL. If you access Jira at the URL
- In the web console, the user icon > Settings.
- Select the Jira tab, complete the fields with information about your Jira user account, and then click Save.
- Select the Jira project you want Calico Cloud to create issues for, and then click Save.
Create a Jira issue for a scanned image
You can create and assign a Jira issue directly from the scan results information page for an image.
- From the web console, click Image Assurance >All Scanned Images.
- Click an item in the list of scanned images to open a detailed view of the vulnerabilities in that image.
- In the JIRA section, click Add Ticket.
- In the Add Jira issue dialog, complete the fields and click Create Jira issue. A link to the new Jira issue will be added to the detailed view page.